How much do you know about car construction?
Generally, all of the new stereo's wiring connections should be made through the wire harness, but if you must make a direct power connection, you must understand the difference between "switched" and "constant" power:A switched power supply is only activated when the ignition is turned on. Connect the primary (switched) power lead of your new stereo - commonly a red wire - to a switched power source so that the stereo turns off when you turn off the car and does not deplete the battery.
A continuous power source is always turned on. Connect the memory connection on your new stereo - generally a yellow wire - to a consistent power source so you don't lose your radio station presets, tone control presets, and clock settings every time you switch off the car.Although uncommon, a few high-powered stereos demand a direct continuous power connection at your vehicle's positive terminal. This necessitates the use of a thicker gauge power wire, an in-line fuse (which is normally supplied), and a ring terminal to connect the power wire to the battery clamp. The power line must be routed to the battery position, which is commonly through the car firewall and into the engine compartment, in order to make the connection at the battery.
Speaker cables
For the standard 4-speaker system, car stereos include eight wires - a positive and a negative wire for the front left, front right, rear left, and rear right speakers. Some of them may not be used depending on your vehicle's wiring setup and the wire harness adapter we provide.
Grounding wire
A strong ground connection is essential for effective stereo performance and noise elimination. Look for a raw, unpainted bolt or screw that contacts the bare metal of your vehicle's chassis if you are not utilizing a bespoke wire harness. Loosen the bolt, then insert the ground wire below (usually a black wire), and tighten the bolt. Your stereo will not work if the ground wire does not make touch with bare metal. A faulty or weak ground connection might cause signal noise to interfere with your music.
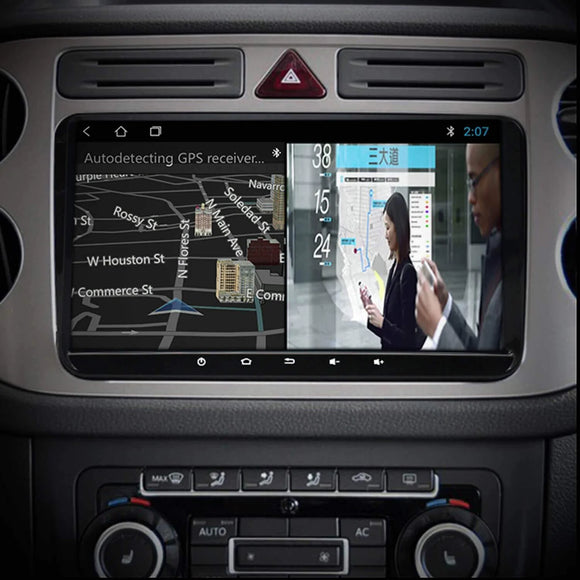
In-car video – cutting the parking brake cable
If your new stereo has a touchscreen or video monitor, you will also need to connect a wire to your emergency/parking brake wire. This wire acts as a switch to turn on the video monitor when the parking brake is engaged. Depending on the braking design, this wire may be located at different locations in different automobiles. The wire is normally located near your parking brake. To access the hand brake on automobiles with a hand brake between the front seats, remove the center console. The audio cable will need to be routed beneath the dash in vehicles with a foot-pedal parking brake. In any case, it isn't that difficult; just take your time. And, once again, Crutchfield's award-winning tech support team can be of great assistance in discovering it and assisting you in getting to it.
Installing the new stereo
Mounting the stereo in the dash.If the original stereo was bolted into the dash, you might need to remove the mounting brackets from the sides of it and attach them to the sides of your new stereo. More likely, you will need a mounting kit to install the stereo.
If a mounting kit is needed, follow the directions that come with it. Install the dash kit first, then insert the new stereo's metal mounting sleeve (if provided) into the kit. Bend the metal tabs of the metal sleeve into position using a screwdriver to secure it. In other circumstances, you first attach the mounting kit to the new stereo, then screw both into the dash.
When the dash opening is ready for the new stereo, place it close to the opening. Plug in the antenna cable and connect the stereo wire adapter to the vehicle's wiring harness. Depending on the stereo, you may also need to connect the Bluetooth microphone wire, a USB cable, a steering wheel control interface, or an auxiliary input connection to the back of the radio.
Examine your work
Insert the stereo into the dash aperture but do not secure it yet. First, test the stereo to ensure that everything is in working order. When everything is revealed, it is easier to solve a problem.
To test the stereo, you'll need to reconnect the battery line, so if you disconnected any airbag warning plugs, be sure you reconnect them before reconnecting the batteries.Turn on the radio and test each source (AM, FM, CD, USB, and so on). Then, ensure that each speaker is operating by adjusting the balance and fader settings. Once you're satisfied the stereo is correctly connected and running, finish fastening it in the dash and replace any dash trim panel pieces you removed.
What about alterations?
To install a new audio in some automobiles, you may need to modify the dash aperture or the region within (referred to as the "dash substructure"). If this is the case for your car, we will notify you when you purchase on our website and in your Crutchfield MasterSheet. Again, if you require assistance, please contact our technical support team.
Are you ready to give it a shot?
You should have a good notion of what it takes to replace your factory radio with a newer, better aftermarket stereo by now. So, go ahead and use our Crutchfield Outfit My Car feature to tell us what sort of car you have. From there, you'll be able to discover specifics on which stereos, speakers, and other accessories will work with your car, as well as the installation tools you'll need to get the job done correctly.